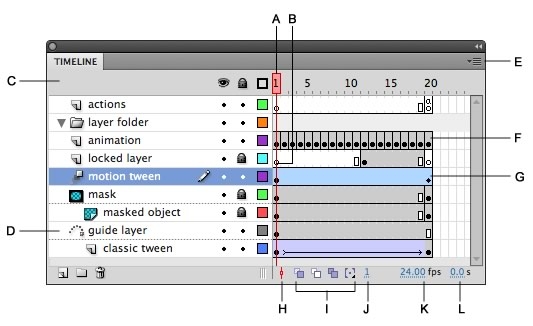
Parts of the Timeline of Flash CC
A. Playhead B. Empty keyframe C. Timeline header D. Guide layer icon E. Frame View pop‑up menu F. Frame-by-frame animation G. Tweened animation H. Center Frame button I. Onion-skinning buttons J. Current Frame indicator K. Frame Rate indicator L. Elapsed Time indicator
1. What is Timeline?
The Timeline organizes and controls a document’s content over time in layers and frames. Like films, Flash Professional documents divide lengths of time into frames. Layers are like multiple film strips stacked on top of one another, each containing a different image that appears on the Stage. The major components of the Timeline are layers, frames, and the playhead.
Layers in a document are listed in a column on the left side of the Timeline. Frames contained in each layer appear in a row to the right of the layer name. The Timeline header at the top of the Timeline indicates frame numbers. The playhead indicates the current frame displayed on the Stage. As a document plays, the playhead moves from left to right through the Timeline.
The Timeline status displayed at the bottom of the Timeline indicates the selected frame number, the current frame rate, and the elapsed time to the current frame.
The Timeline shows where animation occurs in a document, including frame-by-frame animation, tweened animation, and motion paths.
Controls in the layers section of the Timeline let you hide, show, lock, or unlock layers, as well as display layer contents as outlines. You can drag Timeline frames to a new location on the same layer or to a different layer.

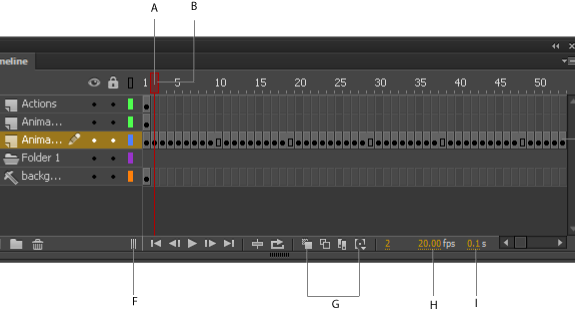
Parts of the Timeline of Flash CS6
| A. Playhead | G. Tweened animation |
| B. Empty keyframe | H. Scroll to Playhead button |
| C. Timeline header | I. Onion-skinning buttons |
| D. Guide layer icon | J. Current frame indicator |
| E. Frame view pop‑up menu | K. Frame rate indicator |
| F. Frame-by-frame animation | L. Elapsed time indicator |
2. What is a tween in flash?
A tween in Adobe Flash Pro is an animation that is created by specifying a value for an object property in one keyframe and another value for that same property in another keyframe. Flash calculates the values for that property in between those two frames. The term tween comes from the words “in between.”
A tween span is a group of frames in the Timeline located between the beginning and ending keyframes of a tween; it is displayed in a single layer with a blue background. Only one object on the stage can be animated in each tween span. This object is called the target object of the tween span. A property keyframe is a frame within a tween span where you explicitly define one or more property values for the tween target object.
3, What is Keyframe?
A keyframe is a frame in Adobe Flash Pro where a new symbol instance appears in the Timeline. A keyframe can also be a frame that includes ActionScript code to control some aspect of your document. You can also add a blank keyframe to the Timeline as a placeholder for symbols you plan to add later or to explicitly leave the frame blank.
A black filled circle in the Timeline indicates the first keyframe (standard keyframe) of a motion tween, whereas the Timeline icon for a property keyframe is a solid diamond.
4. What is the difference between Shape, and Motion / Classic Tweens?
A Motion Tween animates symbols moving in space; when you create a motion tween, then you can click on any frame in the tween, move the symbol on that frame, and watch Flash automatically build a motion path animating the frames between that frame and the next keyframe. Any frame where you’ve manually moved the tweened symbol becomes a keyframe. When applying Motion Tween, you could use the Motion Editor and motion paths, and orient the object to a specific path.
A Classic Tween works the way old motion tweens used to, in Flash CS3 and earlier. In this kind of motion tween, you’d have to manually create all your keyframes and connect all of them with motion tweens that followed point A to point B.
A Shape Tween performs distortions on non-symbol shapes/vector graphics. If you create one shape on one keyframe and another shape on another keyframe, you can connect those two shapes with a shape tween. The tween will perform whatever calculations and morphs needed to transform the first shape into the second. A shape tween is a transformation tween, while a motion tween/classic tween affects position, rotation, and transparency.
In addition to tweening movement, you can tween scales, filters, color effects, and transparency. Objects that can be tweened include movie clip symbols, graphic symbols, button symbols, and text fields. The properties of these objects that can be tweened include the 2D x and y position, scale x and y, skew x and y, 3D z position (movie clips only), 2D rotation (around the z axis), and 3D x, y, and z rotation (movie clips only).
5. What kinds of properties can a motion tween change?
A motion tween creates smooth transitions between different keyframes of an object’s location, scale, rotation, transparency, brightness, tint, filter values, or 3D rotation or translation.
6. What is Ease?
Easing is a technique for modifying the way that Adobe Flash Professional calculates the property values in between property keyframes in a tween. Without easing set, Flash moves tweened objects at the same speed on each frame of the animation. With easing, you can adjust the speed of tweened objects to make movements appear more natural and to create complex animations.
An ease is a mathematical curve that is applied to the property values of a tween. The final effect of the tween is the result of the combination of the range of property values in the tween and the ease curve that makes the tweened objects start slow and speed up, start fast and slow down, or some combination of these effects. For example, if you animate a picture of a car across the Stage, the motion is more realistic if the car starts slowly from a stopped position and gradually gains speed as the acceleration builds momentum.
You can apply Ease-In and Ease-Out effects from the Properties inspector. In the timeline, select the motion tween. In the Properties inspector, enter an easing value between -100 (ease-in) to 100 (ease-out).
7. When you import an Illustrator file, what happens if you import layers as layers? As keyframes?
When you import layers of an Illustrator file into a Flash document as Flash layers, Flash recognizes the layers in the Illustrator document and adds them as separate layers in the Timeline. When you import Illustrator layers as keyframes, Flash adds each Illustrator layer to a separate frame in the Timeline and create keyframes for them.

