Click to view the Twist Effect
- Open the file “twist.fla“
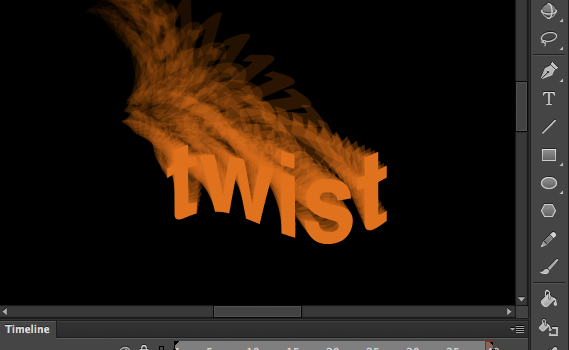
- Cmd J: 320 X 240 / Change the background color to Black
- Open Library: Drag the logo onto the stage / Cmd K
- Select Align to Stage, and Center the logo horizontally and vertically
- Rename the layer to Shape
- Double-click the layer icon of the layer to have Layer Properties box: Select Guide / OK
- Lock the layer, then get a new layer, and name it text
- Select the T tool, type twist / size 70 / Color Orange
- Cmd B twice to break the text apart
- Select the text layer: Modify > Transform > Envelope
- Adjust the text to fix the logo shape, then hide the logo shape layer
- Cmd+Shift A to deselect all, select each letter individually, and F8 to convert letters to symbol one by one, Type: Graphic / Registration: Center for each letter
- Cmd A, Modify > Timeline > Distribute to Layers, then delete the text layer
- Select the frame 30 of the top layer, and hold down shift key to select frame 30 of the bottom layer: F6
- Go back to frame 1 by clicking on it
- Cmd A, then go to Properties panel / Color Effect menu: Alpha: 0
(Outline all letters will let you see all invisible letters) - Zoom out 50% until you can see the entire stage, and select all first frames to drag all letters above to upper left corner into the grey area
- Cmd T (Window > Transform) to skew the letters:
Skew Horizontally: 95 / Skew Vertically: -150 - Select the 1st frame on each layer, Insert Classic Tween
- Rotate to CW (Clockwise) / Easy: 100
- Drag the letter w two frames later, and do the same for each other letter
- Add regular frames to every layer to frame 40
- Choose Onion Skin to preview, then test the effect
Final Effect: http://pxstudio.us/workshop/twist.html